
Last updated: December 19th, 2013

News
- December 19th, 2013
-
- New version of ARGoS released. The latest version is now 3.0.0-beta22. Get it here.
- October 24th, 2013
-
- Added packages for openSUSE 12.3. Get them here.
- October 21st, 2013
-
- New version of ARGoS released. The latest version is now 3.0.0-beta21. Get it here.
- Among the most notable changes, there are:
- The
robot.random.uniform()function is now returning only floating-point numbers; - The newly added
robot.random.uniform_int()function returns only integer numbers; - Fixed a bug in the
robot.motor_groundsensor positioning.
- The
- October 10th, 2013
-
- New version of ARGoS released. The latest version is now 3.0.0-beta20. Get it here.
- Fixes to the exercise files to fix an error at startup. Thanks to Nathan Dwek for spotting them.
- October 2nd, 2013
-
- New version of ARGoS released. The latest version is now 3.0.0-beta19. Get it here.
- September 30th, 2013
-
- New version of ARGoS released. The latest version is now 3.0.0-beta18. Get it here.
- September 24th, 2013
-
- New version of ARGoS released. The latest version is now 3.0.0-beta17. Get it here.
- August 28th, 2013
-
- New version of ARGoS released. The latest version is now 3.0.0-beta15. Get it here.
- July 30th, 2013
- July 4th, 2013
- June 5th, 2013
-
- Updated the loop functions for the project. The output file format changed as follows:
- The first line is a header.
- Every line is composed of three records: current time step, number of robots currently in a chain, number of robots currently on a target.
- Also, the loop function source code is fully commented, to help you modifying it if you want.
- Updated the loop functions for the project. The output file format changed as follows:
- June 2nd, 2013
-
- Fixed a bug in the distance scanner sensor that was preventing the robots from seeing some objects. The latest version is now 3.0.0-beta9. Get it here.
- May 30th, 2013
-
- Fixed a little tagging error in the ARGoS version (I set "v3.0.0-beta7" instead of "3.0.0-beta7"). This was preventing Ubuntu from installing the packages. Fixed also a bug in the linking of the generic simulated sensor plugin. The latest version is now 3.0.0-beta8.
- Added a few more details to the distance scanner description [thanks Florian Wintjens for asking!].
- May 29th, 2013
-
- Released a new version of ARGoS (3.0.0-beta7). This version solves a bug in the range and bearing communication system that some of you have encountered, plus adding a number of additional features.
- You MUST get the new version of ARGoS to continue your project! Get it here.
- Also, you MUST get the updated project configuration file. The old one is not compatible with the new ARGoS version.
- May 22nd, 2013
-
- Fixed a bug in the project configuration file. The distance scanner sensor was missing, so the sensor was not returning any value.
- May 6th, 2013
-
- A few clarifications in the project details.
- Fixed a little bug in the project files.
- May 5th, 2013
-
- Added project details.
- Added solutions for the aggregation and pattern formation exercises.
- May 2nd, 2013
-
- Added slides and experiment configuration file for the pattern formation exercise.
- April 25th, 2013
-
- Added solutions and slides for the aggregation exercise.
- Added slides and experiment configuration file for the synchronization exercise.
- Added new ARGoS3 packages (3.0.0-beta5).
- April 18th, 2013
-
- We set up credentials to log into the machines in the computer room. See here.
- Added new files for the aggregation exercises.
- April 12th, 2013
- April 2nd, 2013
-
- Added solutions for the obstacle avoidance exercise.
- April 1st, 2013
-
- Added new ARGoS3 packages (3.0.0-beta4) for Ubuntu. This new version fixes a segfault at startup that happens on some graphics cards.
- Added a couple of examples to show how to check for equality and inequality in Lua.
- March 28th, 2013
- March 27th, 2013
- March 26th, 2013
- March 25th, 2013
- March 24th, 2013
-
- Added obstacle avoidance experiment file.
- March 23th, 2013
-
- Added ARGoS.
- February 28th, 2013
-
- Created this website and added initial content.
Exercises
Here are the experiment files for the course and their solutions:
- obstacle_avoidance.argos
- The aim of this exercise is to let robots avoid each other and other obstacles.
- simple_obstacle_avoidance.lua: a really simple obstacle avoidance
- gaslike.lua: robots behave like gas particles
- aggregation_1.argos, one_spot.png
- The aim of this exercise is having all robots gather in the black spot.
- aggregation_1.lua: a specific solution for this setup
- aggregation_2.argos, two_spots.png
- The aim of this exercise is having all robots gather in one of the two black spots, i.e., perform a collective choice on one of the two black spots.
- aggregation_2.lua: a specific solution for this setup
- aggregation_0.argos, no_spot.png
- The aim of this exercise is having all robots form a single group somewhere in the arena, without clues such as black spots.
- aggregation_0.lua: a specific solution for this setup
- aggregation.pdf: slides that explain the solutions
- synchronization.argos
- The aim of this exercise is having all robots flash their LEDs at the same time.
- synchronization.pdf: slides that explain the solution
- synchronization.lua: the solution
- pattern_formation.pdf: slides that explain the solution
- pattern_formation.argos
- The aim of this exercise is having the robots form an exagonal pattern.
- pattern_formation.lua: the solution
ARGoS
ARGoS is a multi-robot simulator developed at IRIDIA. We will use it to work on exercises in this course, as well as on the final course project.
Getting ARGoS
The machines in the computer room all have ARGoS installed, and you're encouraged to use them. To log into these machines, you can use your ULB account or these credentials:
- Username: fsa-vub-students
- Password: fsa-vub-students
IMPORTANT: when you log in with these credentials, you just have a temporary, local session on the computer. This means that all data is erased when you log out. Remember to back up your data!
If you prefer to install ARGoS on your computer, download one of the packages below or compile it directly from the sources.
ARGoS works only on UNIX systems (Linux and MacOSX). Windows is not supported.
- ARGoS-3.0.0-beta22 for Ubuntu 32bit (12.04 LTS or newer)
- ARGoS-3.0.0-beta22 for Ubuntu 64bit (12.04 LTS or newer)
- ARGoS-3.0.0-beta22 for openSUSE 32bit (12.3 or newer)
- ARGoS-3.0.0-beta22 for openSUSE 64bit (12.3 or newer)
- ARGoS-v3.0.0 source code on github
Running ARGoS
To run ARGoS, you need an XML file that configures the program for a specific experiment. We will provide you with all the necessary XML files for each exercise. Once you have the XML file, open a terminal window and write this command:
$ argos3 -c file.argos
This will open the two windows of ARGoS - the simulation window and the code editor.
Programming the Robots
Lua
To tell the robots what to do, you need to write a script. The script is written in a language called Lua (v5.1). Lua is a very simple but powerful scripting language. You can find more information on the Lua manual. For nice tutorials, check The Lua Crash Course and the Lua Wikipedia page.
The table below contains a short Lua reference, with examples. It covers just the essential parts of the language you need to program the robots.
| Comments |
-- This is a single-line comment

--[[ This is a multiline
     comment ]]
|
| Variables |
-- assignment (no need to declare a variable)
x = 2.55   -- number
x = "ciao" -- string

-- printing on the ARGoS logger
log("INFO: x = " .. x)
logerr("ERROR: x = " .. x)

-- NOTE: in ARGoS, the standard Lua 'print()' function does not work
|
| Conditionals |
-- simple if/then
if x > 3 then
   logerr("x is too big")
end

-- if/then/elseif/else
if x > 3 then
   logerr("x is too big")
elseif x < 3 then
   logerr("x is too small")
else
   logerr("maybe I just don't like x")
end

-- checking for equality
if x == 3 then
   log("x is equal to 3")
end

-- checking for inequality
if x ~= 4 then
   log("x is different from 4")
end

-- combining conditions with OR
if (x > 3) or (x < 3) then
   logerr("x is not 3")
end

-- combining conditions with AND
if (x > 3) and (y > 3) then
   logerr("x and y are too big")
end

-- negating a condition
if not (x > 3) then
   logerr("x is <= 3")
end
|
| Loops |
-- 'while' loop to print 1 2 3 4 5
x = 0
while x < 5 do
   x = x + 1
   log(x)
end

-- 'repeat until' loop to print 1 2 3 4 5
x = 0
repeat
   x = x + 1
   log(x)
until x == 5

--[[ 'for' loop with increase/decrease of a variable:
     for x = init_value, end_value, step do ... end
     where:
        x = init_value initializes the counting variable x to init_value
        end_value      is the stopping value
        step           is the (optional) value to sum to x at each iteration
     the loop continues:
        - when x <= end_value, if step > 0
        - when x >= end_value, if step < 0
  ]]

-- 'for' loop to print 1 2 3 4 5
for x = 1, 5 do
   log(x)
end

-- 'for' loop to print 1 3 5
for x = 1, 5, 2 do
   log(x)
end

-- 'for' loop to print 5 4 3 2 1
for x = 5, 1, -1 do
   log(x)
end
|
| Tables |
-- creating an empty table
t = {}

-- creating a table with some initial value
t = { x=3 }

-- using the contents of a table: two equivalent ways
log("t.x = " .. t.x)       -- dot syntax
log("t['x'] = " .. t["x"]) -- string syntax

-- printing the contents of a table: a custom function
function table.print(t)
   for key,value in pairs(t) do
      log(key .. " -> " .. value)
   end
end

-- tables are always passed by reference!
t1 = { x=3 }
t2 = t1      -- now t2 points to the contents of t1 -> no deep copy
t2.x = 5
log(t1.x)    -- prints 5, not 3!

-- copying tables the right way
function table.copy(t)
   local t2 = {}
   for key,value in pairs(t) do
      t2[key] = value
   end
   return t2
end
t1 = { x=3 }
t2 = table.copy(t1)
t2.x = 5
log(t1.x)    -- prints 3
log(t2.x)    -- prints 5

-- tables can be used as arrays
a = { "Huey", "Dewey", "Louie" } -- indices are assigned automatically starting from 1
log(a[1])                        -- prints "Huey"
log(a[2])                        -- prints "Dewey"
log(a[3])                        -- prints "Louie"
log(#a)                          -- prints the number of elements in a

-- sorting the contents of a simple table
a = { "Huey", "Dewey", "Louie" }
table.sort(a)  -- this operation modifies a!
table.print(a) -- prints "1 -> Dewey", "2 -> Huey", "3 -> Louie"

--[[ To sort the contents of a nested table, such as those in the robot,
     you need to specify a comparation function to tell the sort algorithm
     how to compare two table elements ]]

-- Take a nested table
t = {
   { x=4, label="Huey" },
   { x=56, label="Dewey" },
   { x=0.6, label="Louie" }
}

-- Sort it by x in increasing order
table.sort(t, function(a,b) return a.x < b.x end)

-- Sort it by x in decreasing order
table.sort(t, function(a,b) return a.x > b.x end)

-- Sort it by label in increasing order
table.sort(t, function(a,b) return a.label < b.label end)

-- Sort it by label in decreasing order
table.sort(t, function(a,b) return a.label > b.label end)
|
| Functions |
-- defining a function
function my_fun(p)
   log("Called my_fun(" .. p .. ")")
end

-- returning a value
function my_add(a, b)
   return a + b
end
|
| Math |
-- All the math functions are part of the 'math' table

-- Setting a 2D vector from length and angle
function vec2_new_polar(length, angle) {
   local vec2 = {
      x = length * math.cos(angle)
      y = length * math.sin(angle)
   }
   return vec2
}
v = vec2_new_polar(2, math.pi/3)

-- Summing two 2D vectors (v1 = v1 + v2)
function vec2_sum(v1, v2) {
   v1.x = v1.x + v2.x
   v1.y = v1.y + v2.y
}
v1 = { x=1, y=2 }
v2 = { x=3, y=1 }
vec2_sum(v1, v2)
table.print(v1)   -- prints "x -> 4", "y -> 3"

-- Getting the angle of a 2D vector
function vec2_angle(v) {
   return math.atan2(v.y, v.x)
}

--[[ NOTE: to get a random number, DO NOT use math.random(). Rather,
     use robot.random, described below. ]]
|
Robot-related Functions and Variables

The robot-related functions and data are stored in the robot table. For
instance, to set the robot wheel speed, you need to call
robot.wheels.set_velocity(2,3)
Analogously, To store the reading of the 4th proximity sensor in a variable named
r, you type
r = robot.proximity[4].value
NOTE: don't modify the values of the robot attributes. More specifically:
- Never write directly into the
robotattributesrobot.proximity[4].angle = 1.67 -- NO!
- Never apply operations such as
table.sort()to therobottabletable.sort(robot.proximity, function(a,b) return a.value > b.value end) -- NO!
- If you intend to use the values of a
robottable, copy that table first:myprox = table.copy(robot.proximity)table.sort(myprox, function(a,b) return a.value < b.value end)
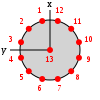
robot.base_ground |
The base ground sensor reads the color of the floor.
It is a list of 12 readings, each containing a table composed of
value and offset. The value is either 0 or 1, where
0 means black (or dark gray), and 1 means white (or light gray). The offset
corresponds to the position read on the ground by the sensor. The position is
expressed as a 2D vector stemming from the center of the robot. The vector
coordinates are in cm.The difference between this sensor and the robot.motor_ground is
that this sensor returns binary readings (0 = black/1 = white), while
robot.motor_ground can distinguish different shades of gray.
|
 |
robot.distance_scanner |
The distance scanner is a rotating device with four sensors. Two sensors are
short-range (4cm to 30cm) and two are long-range (20cm to 150cm). Each sensor
returns up to 6 values every time step, for a total of 24 readings (12 short-range
and 12 long-range). Each reading is a table composed of angle in
radians and distance in cm. The distance value can also be -1
or -2. When it is -1, it means that the object detected by the sensor is closer
than the minimum sensor range (4cm for short-range, 20cm for long-range). When
a sensor returns -2, it's because no object was detected at all.This device is initially off. You need to use the enable() function
to switch it on. The function disable switches it off.
The function set_angle() locks the device at a specific angle, while
set_rpm(s) sets the angular speed of the device to s
(which must be a number). If you want to convert from radians per second to
RPMs, apply the following formula: RPM = 30/pi * radsec.
|
|
robot.gripper |
The gripper allows a robot to connect to objects such as boxes and cylinders, or
other robots. A robot attached to a passive object can transport it, if it is
light enough. To lock the gripper, you use lock_positive() or
lock_negative(). They both do the same job, so you can call the one
you prefer. To unlock the gripper (thus releasing the attached object), use
unlock().
|
 |
robot.id |
A string containing the id of the robot. | |
robot.leds |
Sets the color of the robot LEDs. The robot has a total of 13 RGB LEDs. 12 of them
are arranged in a ring around the robot body, and one (also called the
beacon) is positioned at the top of the robot body. To set the colors of a single LED, use set_single_color(idx, color).
idx is the number of the LED to set (1-12 for the body LEDs, 13 for
the beacon). color can be expressed as a string, such as
"red", "green", "blue", etc., or as a
triplet of numbers r,g,b.To set all colors at once, use set_all_colors(color). The
color parameter works like set_single_color(idx, color).
|
 |
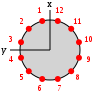
robot.light |
The light sensor allows the robot to detect light sources. The robot has 24
light sensors, equally distributed in a ring around its body. Each sensor reading
is composed of an angle in radians and a value in the range
[0,1]. The angle corresponds to where the sensor is located in the body with respect
to the front of the robot, which is the local x axis. Regarding the value,
0 corresponds to no light being detected by a sensor, while values > 0 mean that light
has been detected. The value increases as the robot gets closer to a light source.
|
 |
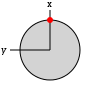
robot.motor_ground |
The motor ground sensor reads the color of the floor.
It is a list of 4 readings, each containing a table composed of
value and offset. The value goes from 0 or 1, where
0 means black, and 1 means white. The offset corresponds to the position read
on the ground by the sensor. The position is expressed as a 2D vector stemming
from the center of the robot. The vector coordinates are in cm.The difference between this sensor and the robot.base_ground is
that this sensor can distinguish different shades of gray, while
robot.base_ground returns binary readings (0 = white/1 = black).
|
 |
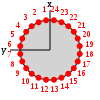
robot.proximity |
The proximity sensors detect objects around the robots. The sensors are 24 and are
equally distributed in a ring around the robot body. Each sensor has a range of 10cm
and returns a reading composed of an angle in radians and a value
in the range [0,1]. The angle corresponds to where the sensor is located in the body with
respect to the front of the robot, which is the local x axis. Regarding the value,
0 corresponds to no object being detected by a sensor, while values > 0 mean that an object
has been detected. The value increases as the robot gets closer to the object.
|
 |
robot.random |
This table offers a set of functions to draw random numbers from a distribution. Use bernoulli() to get either 0 or 1 from a
Bernoulli
distribution with p=0.5. You can also write bernoulli(p) to set
a different value for p.Use exponential(m) to get a random number from an
exponential
distribution with mean m.Use gaussian(s) to get a random number from a
Gaussian
distribution with standard deviation s and zero mean. You can also
write gaussian(s,m) to set a non-zero mean.Use uniform() to get a random number from a
uniform
distribution in the range [0,1). Alternatively, you can use uniform(max)
to get a number between 0 and max, or
uniform(min,max) to get a number between min and
max. If you want integer numbers, use the functions
uniform_int(max) and uniform_int(min,max).
|
|
robot.range_and_bearing |
The range-and-bearing system allows robots to perform localized communication.
Localized communication means that a robot, upon receiving data from another robot, also
detects the position of the sender with respect to its local point of view. It is important
to notice that the range-and-bearing system is not like WiFi. First, because two robots can exchange
data only if they are in direct line of sight - if an object is between two robots, the robots
can't communicate. Second, because robots that send data can only broadcast it in a limited area -
you can't pick who you talk to as you would with an IP address. Third, the robots can exchange only
10 bytes of data. To set the data to broadcast, use set_data(). This function accepts input in two forms.
You can write set_data(idx, data), and this means that you set the idx-th
byte to the value of data. data must be a number in the range [0,255].
Alternatively, you can write set_data(data), where data must be a table
containing exactly 10 numbers in the range [0,255].At each time step, a robot receives a variable number of messages from nearby robots. Each message is stored in a table composed of data (the 10-bytes message payload),
horizontal_bearing (the angle between the robot local x axis and the position
of the message source; the angle is on the robot's xy plane, in radians),
vertical_bearing (like the horizontal bearing, but it is the angle between the message
source and the robot's xy plane), and range (the distance of the message
source in cm).
|
|
robot.wheels |
The real robot moves using two sets of wheels and tracks called treels. For simplicity,
we treat the treels like normal wheels. To move the robot, use set_velocity(l,r) where l and r are
the left and right wheel velocity, respectively. By 'wheel velocity' we mean linear velocity.
In other words, if you say set_velocity(5,5), the robot will move forward at 5cm/s.You can get some information about robot motion and wheels, too. axis_length is the distance
between the two wheels in cm. velocity_left and velocity_right store the current
wheel velocity. distance_left and distance_right store the linear distance
covered by the wheels in the last time step.
|
 |
Project Details
Exam Modalities
Get the full description here: swarm_intelligence_exam_modalities.pdf.
Get the slides shown in class: swarm_intelligence_exam_modalities_slides.pdf.
Introduction
In real-world swarm robotics applications, exploration is an important behavior. Often, the environment in which the robots are deployed is unknown and potentially dangerous for humans, so the robots must be capable to spread and discover its structure and the important locations.
In the course, we learnt the simplest exploration strategy possible---diffusion. Diffusion can be obtained with a simple obstacle avoidance strategy. This strategy is very efficient in those cases in which the robots are in large number (high density of robots per area unit), and the structure of the environment is relatively simple.
When the environment is very large and its structure is complex, obstacle avoidance is not sufficient anymore. The robots must engage in some sort of exploration activity that retains memory of interesting locations and avoids exploring multiple times the same places, potentially neglecting important portions of the environment.
Several methods exist to obtain this goal. Since we are working with robot swarms, we are going to consider a solution that imposes minimal requirements on the robots---chaining.
In a nutshell, chaining consists in connecting two places (i.e., the nest and an important location) with a set of robots positioned along the path that leads from one place to the other. Once the path is formed, additional robots can communicate with the robots along the path to move from a place to the other without the need for exploration. In other words, chaining is a form of collective memory.
Goals
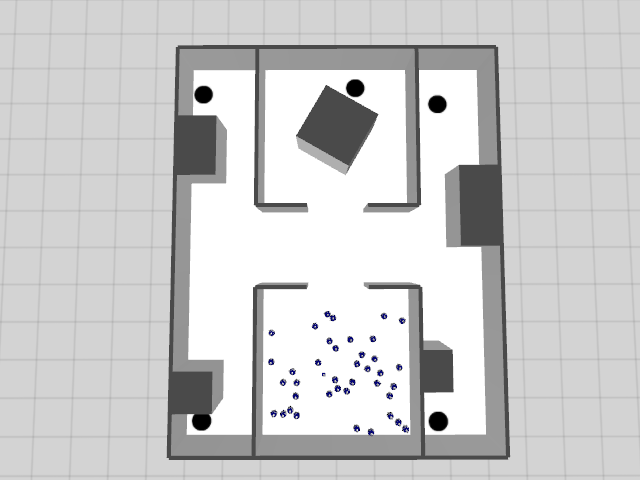
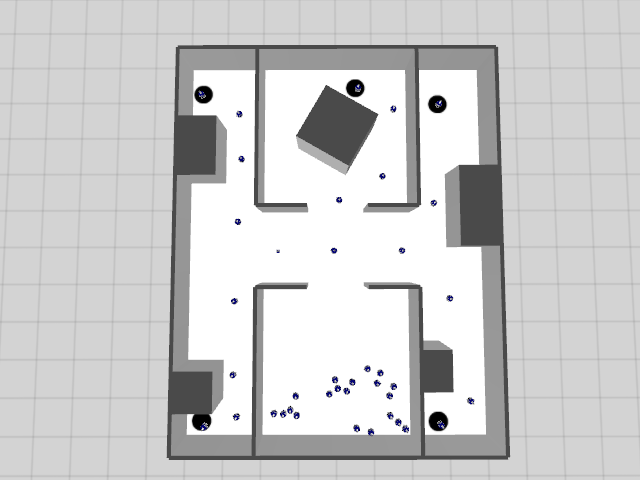
You must implement a chaining strategy for the environment depicted below. The environment loosely mimicks an indoor structure, in which five target locations are marked with black dots. The task of the robots, initially placed in an area that we will call the nest, is to form five chains that connect the nest with the target locations. The experiment is automatically stopped when there is a robot in each location.
The images below show the initial state of the simulation and a possible ending condition. Clearly, your solution doesn't need to look exactly like the second picture. Any chain is acceptable, the important thing is that the five targets are each occupied by a robot.
Structure your solution as a state machine. This is the most important coding aspect you must respect. A state machine allows you to decouple a complex problem into simpler instances, whose solution is easier to develop.
Use the distance scanner. It is a powerful sensor, that provides long-range information on the structure of the environment around the robots.
As you know from the course, the robots can communicate wirelessly through the range-and-bearing sensor. The communication range impacts both the number of robots necessary to complete the chain, and the structure of the chain. Pay attention to the communication range! You will get extra points if you perform a study of the role of the communication range on your behavior.
Characterize your solutions at least with respect to these two metrics:
- Average time necessary to reach all the locations and standard deviation;
- Average number of robots involved in the chains and standard deviation.
ARGoS automatically dumps data on a file whose name must be set by you in the XML experiment configuration. This file is composed by several lines, each line containing two elements: the current step and the number of robots that are part of a chain at that step. Thus, to calculate the two metrics, you just need to consider the last line of the output file. To calculate the metrics run at least 30 repetitions of each experimental setup. Be sure to read the section about counting robots below.
For a successful project, the code must be working and the report must be clear and complete. It is important to make a nice analysis, with the necessary data to support your statements. Use graphs and tables wherever you consider it appropriate. Try to show us that you really understood your idea, and convince us that it works. If you find unsolvable problems, due to robot limitations, you can discuss them.
Deliverables
- The Lua scripts that you developed, well commented and well structured.
- A report of 4-6 pages structured as follows:
- Main idea of your approach [1 page]
- Structure of your solution (the state machine) [2 pages]
- Analysis of the results [1-3 pages]
Technical Information
In this section you'll learn how to run the project assignment. You must download a package that contains the necessary files to execute the experiment:
- The XML configuration file;
- The loop functions (i.e., the logic to gather the data) in source format.
To run the experiment, you need some setup explained in the following.
NOTE: the loop functions are given to you in source format. You are allowed to modify them if you want to log more data (this is optional). However, do not modify them to cheat on the results! We will run your code with the original loop functions, just to be sure. If you modify the loop functions, add them to the material you send us.
Setting up the Code
- Download the experiment files for your system: INFO-H-414-SR-20150604.tar.bz2.
- Unpack the archive and compile the code:
$ tar xvf INFO-H-414-SR-20150604.tar.bz2 # Unpacking $ cd INFO-H-414-SR # Enter the directory $ mkdir build # Creating build dir $ cd build # Entering build dir $ cmake -DCMAKE_BUILD_TYPE=Release ../src # Configuring the build dir $ make # Compiling the code - Set the environment variable
ARGOS_PLUGIN_PATHto the full path in which thebuild/directory is located:$ export ARGOS_PLUGIN_PATH=/path/to/INFO-H-414-SR/build/You can also put this line into yourHOME/.bashrcfile, so it will be automatically executed every time you open a console. - Run the experiment to check that everything is OK:
$ cd /path/to/INFO-H-414-SR   # Make sure you are in the right directory
$ argos3 -c landmarks.argos   # Run the experiment
If the usual ARGoS GUI appears, you're ready to go.
Setting up the Experiment
Switching the visualization on and off. The experiment configuration file allows
you to launch ARGoS both with and without visualization.
When you launch ARGoS with the visualization, you can program the robots interactively exactly
like you did during the course. Launching ARGoS without the visualization allows you to run multiple
repetitions of an experiment automatically, e.g., through a script. By default, the script launches
ARGoS in interactive mode. To switch the visualization off, just substitute the visualization
section with: <visualization />, or, equivalently, comment out the entire
qt-opengl section.
Loading a script at init time. When you launch ARGoS without visualization, you
can't use the GUI to set the running script. However, you can modify the XML configuration file
to load automatically a script for you. At line 46 of landmarks.argos you'll see that
the Lua controller has an empty section <params />. An example of how to set
the script is at line 49 of the same file. Just comment line 46, uncomment line 49 and set the
script attribute to the file name of your script.
Changing the random seed. When you want to run multiple repetitions of an experiment,
it is necessary to change the random seed every time. To change the random seed, set the value at line
11 of landmarks.argos, attribute random_seed. If you want a different random
seed for every experiment, just remove the random_seed attribute altogether. The seed will
be chosen using the computer clock.
Changing the output file name. As explained above, ARGoS automatically dumps data to
a file as the experiment goes. To set the name of this file, set a new value for the attribute
output at line 17 of landmarks.argos.
Changing the number of robots. If you want to increase or decrease the number of
robots taking part in the experiment, change the quantity attribute at line 118 of
landmarks.argos.
Changing the range of the range-and-bearing system. To change the communication range of
the range-and-bearing system, set the value of the attribute rab_range at line 121. It is
expressed in meters.
Making ARGoS run faster. Sometimes ARGoS is a little slow, especially when many robots and
many sensors are being simulated. You can make ARGoS go faster by setting the attribute threads
at line 9 of landmarks.argos. Experiment with the values, because the best setting depends on your
computer.
About Counting the Robots in a Chain
The loop functions provided in the package count the number of robots in a chain automatically. For this
mechanism to work, in your script you MUST define a variable called robot.in_chain, and
set it to 0 when the robot is not part of a chain, and 1 when it is.
If you forget to set this variable, the loop functions won't be able to count the number of robots in a chain.
Be sure to set the variable in the init() function, not in the global scope. If you set it in the
global scope, an error will occur.
Frequently Asked Questions
There was an error in the project configuration file of May 6th. The distance scanner sensor configuration was missing. This issue has been solved in the version of May 22nd.
[thanks Harold Waterkeyn for spotting this!]
There was a bug in the distance scanner sensor. This issue has been solved in version 3.0.0-beta9.
[thanks Florian Wintjens and Jérémy Pagé for spotting this!]
There was a bug in ARGoS in all versions before 3.0.0-beta7. This issue has been solved in version 3.0.0-beta7.
[thanks Harold Waterkeyn, Bernard Mayeur, and François Remy for spotting this!]
There was a bug in ARGoS in all versions before 3.0.0-beta7. This issue has been solved in version 3.0.0-beta7.
[thanks Harold Waterkeyn for spotting this!]
   MyTable = {}
   MyTable.__index = MyTable
and then select a robot, ARGoS gets slow and eventually crashes. What's wrong?This is a known issue with the variable state widget of the Lua editor in ARGoS. The bug is still there, but there is a workaround. Do something like this:
   MyTable = {}
   MyTable_mt = {}
   MyTable.__index = MyTable_mt
[thanks François Remy and Jérémy Pagé for spotting this!]
Sure. Just remove the
random_seed attribute from the <experiment> section.[asked by François Remy]
You just did. If you have questions of general interest, they will end up here, along with answers.
Contact
| Carlo Pinciroli | cpinciro@ulb.ac.be | for help with the robotics project |
| Manuele Brambilla | mbrambil@ulb.ac.be | for help with the robotics project |
| Marco Dorigo | mdorigo@ulb.ac.be | for administrative stuff |
| Mauro Birattari | mbiro@ulb.ac.be | for administrative stuff |
| Course Web Site | http://cs.ulb.ac.be/public/teaching/infoh414/ | |