Difference between revisions of "FabLab"
| (3 intermediate revisions by the same user not shown) | |||
| Line 21: | Line 21: | ||
== Equipment == |
== Equipment == |
||
There is one office and 3 rooms full of equipment at FabLab. The website describes some of the equipment available, but is not up to date (some pieces are no longer available and some are missing). |
There is one office and 3 rooms full of equipment at FabLab. The website describes some of the equipment available, but is not up to date (some pieces are no longer available and some are missing). |
||
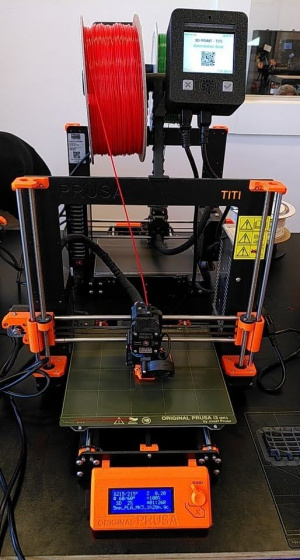
| + | [[File:Printer.jpg|thumb|Prusa i3 MK3 3D printer]] |
||
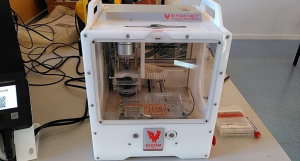
| + | [[File:Bantam.jpg|thumb|Bantam PCB milling machine]] |
||
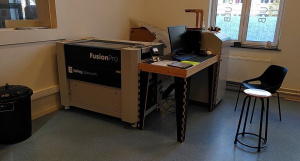
| + | [[File:Laser cutter.jpg|thumb|Laser cutter]] |
||
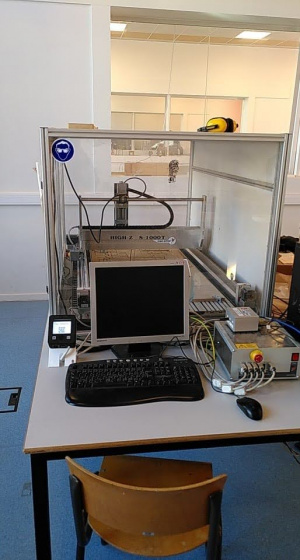
| + | [[File:Cnc.jpg|thumb|High-Z S-1000/T CNC router]] |
||
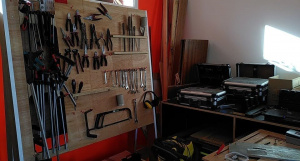
| + | [[File:Tools.jpg|thumb|Tools]] |
||
=== 3D printers === |
=== 3D printers === |
||
| + | There are 8 Prusa i3 MK3 3D printers with 0.4mm nozzles at FabLab. The basic process to print your own pieces is the following: |
||
| − | TODO |
||
| + | ==== Design ==== |
||
| + | You can use an existing model (for example from [https://www.thingiverse.com/ Thingiverse]) or create your own. To create your own model, you can simply use CAD software (e.g. [https://www.freecadweb.org/ FreeCAD]) or more complex 3D creation software (e.g. [https://www.blender.org/ Blender]). In either case, you will need to export your design as an STL file in order to slice it afterwards. In general, a tolerance of 0.1mm is required for tight-fitting parts. However, PLA tends to shrink ~2-5%, so you might have to print your piece a couple of times and tweak your design parameters before you find the correct values. |
||
| + | ==== Slicing ==== |
||
| + | The process of slicing consists of generating the code (G-code) that will be executed by the 3D printer from a given model. Once you have your STL file, there are multiple software alternatives to generate the G-code. FabLab recommends [https://www.prusa3d.com/prusaslicer/ PrusaSlicer] and provides instructions to set the required parameters, so we will stick to that as well (Note that all the settings mentioned will work for most pieces, but you might need to modify them if your piece requires, for example, more infill or a higher level of detail): |
||
| + | # Import your STL file and place it on the desired part of the plate using the Object manipulation menu on the right. |
||
| + | # Set the editing mode (top right corner) to Advanced and modify the following parameters: |
||
| + | #* From the Print Settings tab: |
||
| + | #** Select the 0.20mm QUALITY @MK3 system preset from the drop-down menu at the top. |
||
| + | #** Layers and perimeters: |
||
| + | #*** Vertical shells > Perimeters : 3 |
||
| + | #*** Horizontal shells > Solid layers > Top : 3 |
||
| + | #*** Horizontal shells > Solid layers > Bottom : 3 |
||
| + | #*** Quality (slower slicing) > Detect bridging perimeters : ''Tick'' |
||
| + | #** Infill: |
||
| + | #*** Fill density : 10% |
||
| + | #** Skirt and brim: |
||
| + | #*** Brim width : 3 |
||
| + | #** Support material: |
||
| + | #*** Support material > Generate support material : ''Tick'' |
||
| + | #*** Options for support material and raft > Support on build plate only : ''Tick'' |
||
| + | #* From the Filament Settings tab: |
||
| + | #** Select the Prusa PLA filament from the drop-down menu at the top |
||
| + | #** Filament: |
||
| + | #*** Filament > Cost : 25.4 |
||
| + | #* Make sure the printer selected in the Printer Settings tab is the Original Prusa i3 MK3. |
||
| + | # Save these settings so you will not have to do this every time you want to slice a new piece. |
||
| + | # Go back to the Plater tab and click on Slice now (bottom right). Your model will now be shown as a collection of the individual horizontal slices that will be sequentially printed (use the slider on the right to see each layer). The table on the top-left corner will give you an estimate of the required printing time. |
||
| + | # Click on Export G-code (bottom right) to generate the GCODE file. |
||
| + | |||
| + | ==== Printing ==== |
||
| + | Each 3D printer has its own SD card. To print your own piece, you first need to copy your GCODE file to a folder with your name in the SD card. You may then leave all your designs in that folder, that is, you do not need to delete your files after every print. There are no USB adapters for SD cards at FabLab, so you will either need to bring your own or ensure that your laptop has an SD card slot. Insert the SD card back into the printer and then: |
||
| + | # Clean the tray with acetone. |
||
| + | # Select your file using the knob to navigate the menu. |
||
| + | # Make sure the temperature settings are correct. For PLA, the nozzle temperature should be 210-215°C and the plate temperature, 60°C. |
||
| + | # Once the printing begins, stay by the printer while the first 3 layers are printed in order to make sure that everything is working correctly. You can then leave and come back later to retrieve the piece. |
||
| + | # To retrieve the piece, remove the magnetic plate from the printer and gently bend it and twist it for the piece to come off. Throw discarded plastic (e.g. support material and the brim) to the bin. |
||
=== PCB milling machine === |
=== PCB milling machine === |
||
| + | The Bantam tool is more adequate to produce prototypes of circuit because the PCB used in this machine is more fragile than the one used in the industrial ones. The PCB milling bits can also be fragile and it is recommended to use your own. |
||
| − | TODO |
||
=== Laser cutter === |
=== Laser cutter === |
||
| + | The use of this machine is quite similar to the one at the Lab. They use Inkscape for the design. They only allow some kind of material in the machine (e.g. multiplex) and do not recommend wood with glue in it (MDF) |
||
| − | TODO |
||
=== CNC router === |
=== CNC router === |
||
| + | The training for the High-Z S-1000/T CNC router is longer than for the rest of the equipment (4h), so they wait until they have enough participants to organise one. |
||
| − | TODO |
||
=== Tools === |
=== Tools === |
||
| + | There are a variety of tools available and free to use at FabLab. There are also workbenches to give you the space you need for your project. |
||
| − | TODO |
||
Latest revision as of 12:25, 4 November 2021
The ULB FabLab is part of a global and collaborative network of "Fabrication laboratory". Their main goal is to provide the ULB community and the public with access to all the equipment necessary to build all kinds of things.
Website: http://fablab-ulb.be/
Contact: contact@fablab-ulb.be
Access
It is located on the first floor of Building G inside the See U venue. There are two ways to access it:
- Enter See U from Rue Fritz Toussaint 8, then walk to Building F, which is connected to Building G.
- Enter See U from Avenue de la Couronne, then walk directly to Building G.
It takes about 15 minutes to get to FabLab on foot from IRIDIA.
Training
To use any piece of equipment, specific training is required. The training is always free of charge for the members of the ULB community. The sessions usually last 1 hour except for the CNC (4h). Everything is in French at FabLab, but you can request training in English. To book a training session, you can either send them an email or go to the site and ask them. They might not reply to emails, so I would recommend going to FabLab and asking in person. You might need to wait for enough people to want to take the training. To avoid this, it is best to gather 3-4 people from IRIDIA who are interested in using the equipment at FabLab and ask for a training session together.
Booking and fees
FabLab is open from Monday to Friday between 9am and 6pm. Once you have gone through the training course for a specific piece equipment, you can either send them an email or ask in person to book the machine for a specific date and time (they are currently testing a new system with access cards but it is not operational yet). You will not have to wait for more than a few days, except maybe for the 3D printers in time of high demand. Two people are present at all time in the office to help you.
The use of all the equipment is free of charge for members of the ULB community. You only need to provide your own wood, if necessary. PLA and PCBs are provided for free.
Equipment
There is one office and 3 rooms full of equipment at FabLab. The website describes some of the equipment available, but is not up to date (some pieces are no longer available and some are missing).
3D printers
There are 8 Prusa i3 MK3 3D printers with 0.4mm nozzles at FabLab. The basic process to print your own pieces is the following:
Design
You can use an existing model (for example from Thingiverse) or create your own. To create your own model, you can simply use CAD software (e.g. FreeCAD) or more complex 3D creation software (e.g. Blender). In either case, you will need to export your design as an STL file in order to slice it afterwards. In general, a tolerance of 0.1mm is required for tight-fitting parts. However, PLA tends to shrink ~2-5%, so you might have to print your piece a couple of times and tweak your design parameters before you find the correct values.
Slicing
The process of slicing consists of generating the code (G-code) that will be executed by the 3D printer from a given model. Once you have your STL file, there are multiple software alternatives to generate the G-code. FabLab recommends PrusaSlicer and provides instructions to set the required parameters, so we will stick to that as well (Note that all the settings mentioned will work for most pieces, but you might need to modify them if your piece requires, for example, more infill or a higher level of detail):
- Import your STL file and place it on the desired part of the plate using the Object manipulation menu on the right.
- Set the editing mode (top right corner) to Advanced and modify the following parameters:
- From the Print Settings tab:
- Select the 0.20mm QUALITY @MK3 system preset from the drop-down menu at the top.
- Layers and perimeters:
- Vertical shells > Perimeters : 3
- Horizontal shells > Solid layers > Top : 3
- Horizontal shells > Solid layers > Bottom : 3
- Quality (slower slicing) > Detect bridging perimeters : Tick
- Infill:
- Fill density : 10%
- Skirt and brim:
- Brim width : 3
- Support material:
- Support material > Generate support material : Tick
- Options for support material and raft > Support on build plate only : Tick
- From the Filament Settings tab:
- Select the Prusa PLA filament from the drop-down menu at the top
- Filament:
- Filament > Cost : 25.4
- Make sure the printer selected in the Printer Settings tab is the Original Prusa i3 MK3.
- From the Print Settings tab:
- Save these settings so you will not have to do this every time you want to slice a new piece.
- Go back to the Plater tab and click on Slice now (bottom right). Your model will now be shown as a collection of the individual horizontal slices that will be sequentially printed (use the slider on the right to see each layer). The table on the top-left corner will give you an estimate of the required printing time.
- Click on Export G-code (bottom right) to generate the GCODE file.
Printing
Each 3D printer has its own SD card. To print your own piece, you first need to copy your GCODE file to a folder with your name in the SD card. You may then leave all your designs in that folder, that is, you do not need to delete your files after every print. There are no USB adapters for SD cards at FabLab, so you will either need to bring your own or ensure that your laptop has an SD card slot. Insert the SD card back into the printer and then:
- Clean the tray with acetone.
- Select your file using the knob to navigate the menu.
- Make sure the temperature settings are correct. For PLA, the nozzle temperature should be 210-215°C and the plate temperature, 60°C.
- Once the printing begins, stay by the printer while the first 3 layers are printed in order to make sure that everything is working correctly. You can then leave and come back later to retrieve the piece.
- To retrieve the piece, remove the magnetic plate from the printer and gently bend it and twist it for the piece to come off. Throw discarded plastic (e.g. support material and the brim) to the bin.
PCB milling machine
The Bantam tool is more adequate to produce prototypes of circuit because the PCB used in this machine is more fragile than the one used in the industrial ones. The PCB milling bits can also be fragile and it is recommended to use your own.
Laser cutter
The use of this machine is quite similar to the one at the Lab. They use Inkscape for the design. They only allow some kind of material in the machine (e.g. multiplex) and do not recommend wood with glue in it (MDF)
CNC router
The training for the High-Z S-1000/T CNC router is longer than for the rest of the equipment (4h), so they wait until they have enough participants to organise one.
Tools
There are a variety of tools available and free to use at FabLab. There are also workbenches to give you the space you need for your project.
